If you’ve ever wondered how internet radio stations work and/or wanted to create your own, this tutorial will show you how. It is actually very easy, and you can set up your own radio station and begin broadcasting songs in about 10 minutes.
First of all, let me give you a quick rundown on how it works. You have your music player (I will use Winamp, get it if you don’t have it) and you play your music as you normally would. You probably need a fast internet connection so you can broadcast without buffering occuring. Through a plugin (which you will download and install), Winamp will send the music you play to the broadcasting server (which can be on your PC or on another one with a larger connection), and the server sends the music to the listeners, reencoding it to a better format, if you are so inclined. Note that the amount of listeners you will be able to support is limited by your outgoing bandwidth and the bitrate of the song you are streaming, so if you’re streaming at 128 kbps and you have 256 kbps upload bandwidth, you’ll obviously be able to support 256/128 = 2 listeners.
The programs I use are Winamp for playing, oddcast DSP for broadcasting to the server and Icecast for serving. You can use Winamp’s own Shoutcast plugin and server, but I prefer to broadcast in Vorbis because it’s smaller and has much better quality than MP3.
Let’s get started, then. Download Icecast from this page (you presumably want the Windows version) and install it. Run it and click “Edit configuration” in the “Configuration” menu. A notepad window will pop up with various configuration options. My configuration is this:
<icecast>
    <limits>
        <clients>100</clients>
        <sources>2</sources>
        <threadpool>5</threadpool>
        <queue-size>524288</queue-size>
        <client-timeout>30</client-timeout>
        <header-timeout>15</header-timeout>
        <source-timeout>10</source-timeout>
        <burst-on-connect>1</burst-on-connect>
        <burst-size>65535</burst-size>
    </limits>

    <authentication>
        <source-password>hackme</source-password>
        <relay-password>hackme</relay-password>
        <admin-user>admin</admin-user>
        <admin-password>hackme</admin-password>
    </authentication>

    <hostname>localhost</hostname>
    <listen-socket>
        <port>8000</port>
    </listen-socket>

    <fileserve>1</fileserve>


    <paths>
        <basedir>./</basedir>

        <logdir>./logs</logdir>
        <webroot>./web</webroot>
        <adminroot>./admin</adminroot>
        <alias source="/" dest="/status.xsl"/>
    </paths>

    <logging>
        <accesslog>access.log</accesslog>
        <errorlog>error.log</errorlog>
        <loglevel>4</loglevel> <!-- 4 Debug, 3 Info, 2 Warn, 1 Error -->
        <logsize>10000</logsize> <!-- Max size of a logfile -->
    </logging>

    <security>
        <chroot>0</chroot>
    </security>
</icecast>
</code>
You can copy it and paste it in the open notepad window (the one with the
configuration), but make sure you change hackme to more secure passwords. Once
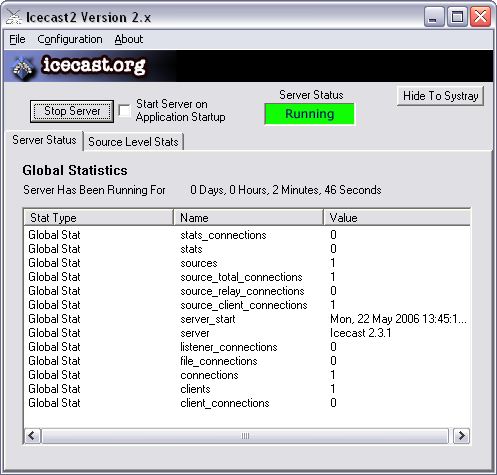
you have done this, save the file and close the window. Click the “Start server”
button and the listboxes below should be populated with various information,
like this:
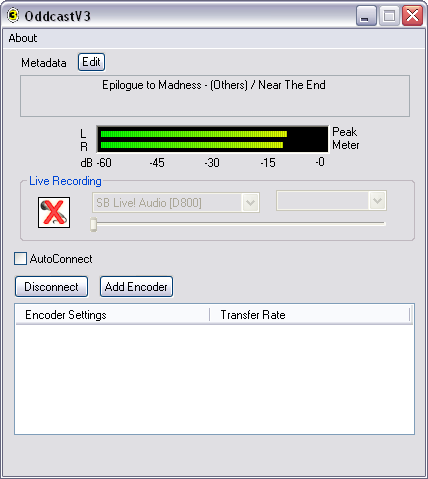
Your server is now ready for people to connect to it, but there’s no music playing, so let’s tend to that. Download oddcast for Winamp from this page and install it. Now, run Winamp, go to the “DSP/Effect” section of the preferences and click on “oddcast DSP v3”. You should see the oddcast window pop up, looking something like this:
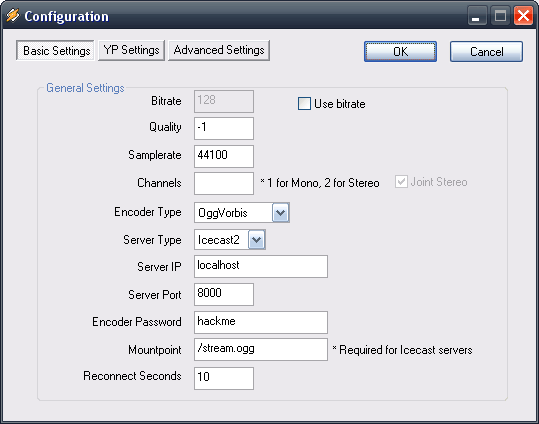
Click on “Add encoder” and a new encoder will be added in the box below. Right-click on it and select “configure”. A dialog will pop up, asking for various information. For “Encoder type” select “OggVorbis” (or MP3, if you are so inclined), this will make you stream in Vorbis. Some people might not be able to have the available codecs if they’re running a very old version of their player (all newer players worth their salt support Vorbis).
For “Quality” I have entered -2, it is the lowest quality, giving you about 30 kbps bitrate and very acceptable quality. You can experiment with 0 or 2, going over 6 is overkill in my opinion (since 6 is what I use to archive music from my CDs), and you will be able to support more listeners if you have lower bitrate for the song.
For “Server IP” enter the IP of the server you’re running Icecast on (it’s “localhost” if you’re running it on your own PC). “Server port” is whatever you entered in the configuration, 8000 if you used mine, and “Encoder password” is hopefully something other than “hackme”. I also use mono, because my connection only has 128 available upstream bandwidth and it doesn’t sound too bad. It should now look like this:
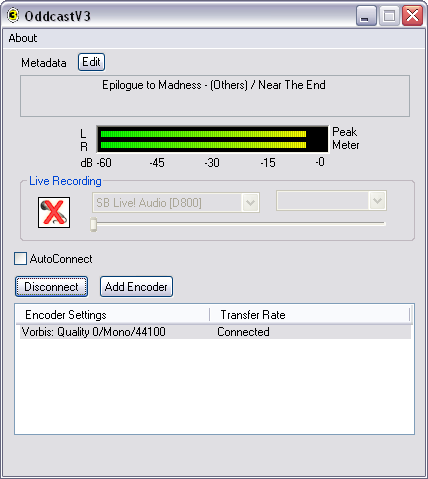
Click OK here and then click “Connect”. If you did everything right, the encoder should now connect to Icecast and begin streaming, like so:
If you want to do a voiceover (speak in your radio) just click the Live Recording button and it will broadcast anything that you say in the microphone (or whatever you enter as the input device). Click on it again to return to your normal music (I haven’t actually tested this, if there are any problems just comment here).
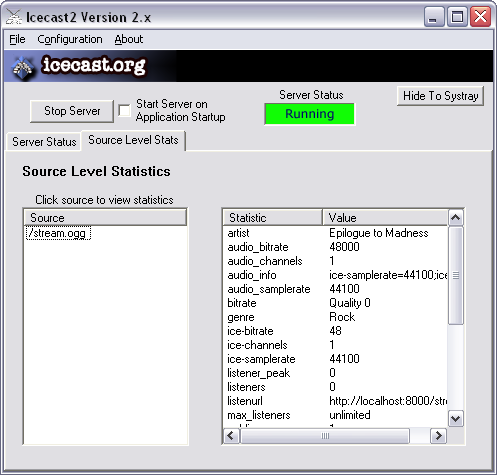
The “Source Level Stats” section of Icecast should also change to include your stream, and will look something like this:
Try connecting with another player (not the one playing the songs) to
http://localhost:8000/stream.ogg (e.g. for Winamp click Open URL). If that
connects and plays, everything is set up correctly. You can now tell people to
connect with Winamp or whatever player they use (and NOT WITH AN INTERNET
BROWSER) to http://[yourip]:8000/stream.ogg (if you don’t know your IP, visit
http://checkip.dyndns.org/, or see the “Client address” in the “Details” tab
of your Local Area Connection if you want to stream on a LAN) with their
players, and that’s all there was to it.
If you get a permission error under Vista, swamplingman suggested that you give your user full permissions for the Icecast and Winamp folders. That should solve the error.
Note: Before you broadcast any music, make sure you have the right to do so, otherwise you could be breaking the law of your country. Also, if you are having connection problems, you are probably behind a NAT or a firewall that does not allow other people to connect to your computer. To clarify, you (from your internal network) can only connect to your station using your internal IP (192.168.0.1 or whatever) and people from the internet can only connect to you using the IP from whatismyip.com and only if you have forwarded port 8000 corrrectly. Ask your network administrator or visit http://www.portforward.com/ for help, as these problems are outside the scope of this tutorial.